
Teams is getting more and more popular everyday. Microsoft includes it for free with their Office Suite and since a lot of organizations are heavily invested into using Microsoft products, people just start using it.
Unfortunatley, this is contributing to the centralization of the internet.
This post isn’t about that though.
This post is a written version of a video I made on making Asterisk a Teams Direct Routing SBC. You can check the video out by following this link.
By default, you cannot use Asterisk with Teams. This is because Asterisk puts the IP address of the machine it is running on in the SIP packages it sends and receives. With a small modification to the Asterisk source code, we can circumvent this limitation. Another requirement for Teams is that we use TLS, but luckily, Asterisk supports this by default.
This is a great way to quickly get started Teams Direct Routing. You could be making calls in less than 30 minutes, depending on what you already have. While this setup isn’t production ready (there are known problems), it is a great proof of concept.
You will need:
- A server to run Asterisk on - A VPS will work. Need a VPS? Check out Digital Ocean
- A domain name - You could use DuckDNS or use your own domain
- An account with a VoIP provider - In NL? Check out Speakup! Somewhere else? Check out Telnyx
- A Microsoft 365 tenant - you can create a free developer tenant with the necessary licenses here
Setup a server and download Asterisk #
Log in to your server or create one. In my video, I quickly go over making a server in the Digital Ocean cloud. Once you have a server. Start by downloading Asterisk source code onto the server.
wget http://downloads.asterisk.org/pub/telephony/asterisk/asterisk-18.9.0.tar.gz
Then untar the file
tar xvf asterisk-18.9.0.tar.gz
cd asterisk-18.9.0
Let’s first install all the build prerequisites we need:
contrib/scripts/install_prereq install
Then modify the source code (this is the juicy bit).
Edit res/res_pjsip_nat.c and apply this patch:
--- res/res_pjsip_nat.c	2021-12-09 17:44:54.000000000 +0100
+++ ../asterisk-18.9.0-modified/res/res_pjsip_nat.c	2022-01-02 22:28:30.399394130 +0100
@@ -445,7 +445,7 @@
 			pjsip_method_cmp(&cseq->method, &pjsip_register_method)) {
 			/* We can only rewrite the URI when one is present */
 			if (uri || (uri = nat_get_contact_sip_uri(tdata))) {
-				pj_strdup2(tdata->pool, &uri->host, ast_sockaddr_stringify_host(&transport_state->external_signaling_address));
+				pj_strdup2(tdata->pool, &uri->host, "my.teams.sbc.hostname");
 				if (transport->external_signaling_port) {
 					uri->port = transport->external_signaling_port;
 					ast_debug(4, "Re-wrote Contact URI port to %d\n", uri->port);
@@ -455,7 +455,7 @@

 		/* Update the via header if relevant */
 		if ((tdata->msg->type == PJSIP_REQUEST_MSG) && (via || (via = pjsip_msg_find_hdr(tdata->msg, PJSIP_H_VIA, NULL)))) {
-			pj_strdup2(tdata->pool, &via->sent_by.host, ast_sockaddr_stringify_host(&transport_state->external_signaling_address));
+			pj_strdup2(tdata->pool, &via->sent_by.host, "my.teams.sbc.hostname");
 			if (transport->external_signaling_port) {
 				via->sent_by.port = transport->external_signaling_port;
 			}
Of course, you enter your own hostname here.
Now check your build environment
./configure
If you did it right, you will see an Asterisk logo in ASCII art in your terminal.
Before we start compiling, now is a great time to modify our install. Type
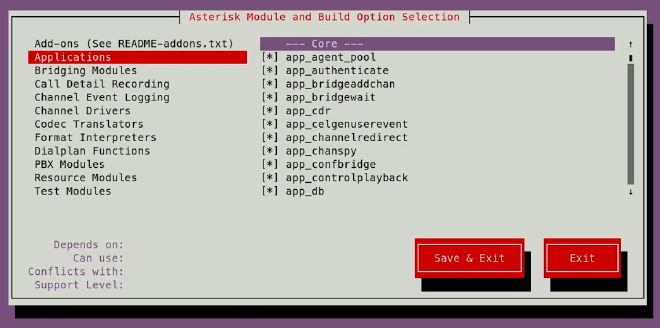
make menuselect
You will get an ncursus UI where you can select/deselect options for your new PBX / SBC. You might want to enable codec_silk under ‘Codec Translators’ because this is the codec that Teams uses by defaukt. However, your VoIP provider probably won’t support this, but it’s good to have it anyway. Teams also support the g722, alaw and ulaw codecs and those are most common with VoIP providers.
After making and saving your changes, you can compile Asterisk with
make -j4
After compiling, you can install Asterisk on your system
make install
ldconfig
make config
make basic-pbx
Awesome!
Now configure the pjsip.conf and extensions.conf in /etc/asterisk. You can copy and edit mine.
Also check your modules.conf file and make sure the correct modules for the codecs you want to use are loaded, as well as res_srtp.so.
Let’s now get a certificate. We configured a TLS transport and that expects a valid certifcate at the paths supplied in the config. We’re using acme.sh for this.
# Installs acme.sh
curl https://get.acme.sh | sh -s email=youremail@example.com

mkdir /etc/asterisk/ssl

acme.sh --issue --standalone \
	-d my.teams.sbc.hostname \
	--fullchain-file /etc/asterisk/ssl/cert.crt \
	--cert-file /etc/asterisk/ssl/ca.crt \
	--key-file /etc/asterisk/ssl/privkey.crt \
	--server https://acme-v02.api.letsencrypt.org/directory
This issues a certificate by spinning up a temporary webserver on :80 for verification. After validation, acme.sh will place all the files at the paths that Asterisk expects them to be. If you expect to leave your setup running for longer than 3 months, make sure Asterisk reloads or restarts after certificate renewal.
You can now start Asterisk
systemctl enable asterisk
systemctl start asterisk
Now our tenant. We need a tenant with the phone system license. If you don’t want to pay for one and you’re just testing this, you can create a free developer tenant with the necessary licenses here.
Sign up for one or / and log in to your tenant with admin credentials.
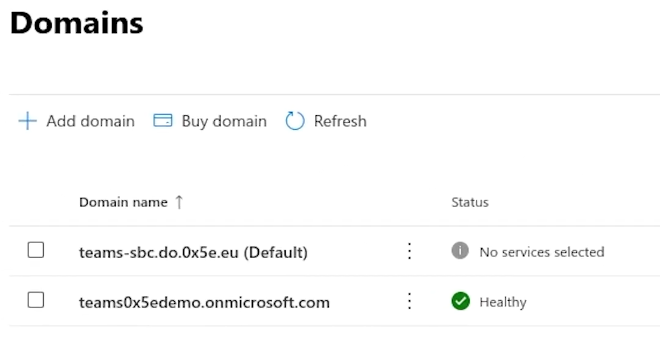
Go to the admin center. You need to add your SBCs hostname to the domains section. Go to ‘Settings > Domains’ and click ‘Add Domain’. In the ‘Domain name’ field, type the hostname of your SBC and verify it with a TXT record with the same name. When you’re asked to add additional records for (for example) email, uncheck “Exchange and Exchange online protection”. You can then proceed to the next step and the domain will be added.
Now create a new user with the newly added domain name and log in once. This user can be deleted afterwards.
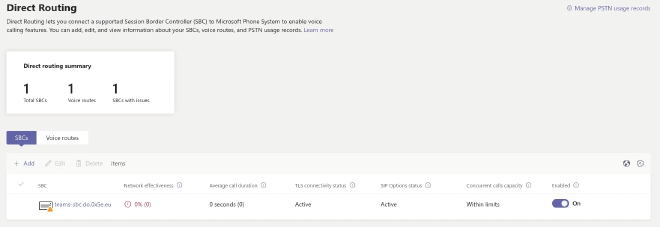
You are now ready to add the SBC to Teams. Go to the Teams Admin Center and go to ‘Voice > Direct Routing’. Clcik ‘Add’ and fill in the hostname and port of your SBC. Additionaly, you can enable the ‘Forward P-Asserted-Identity (PAI) header’ option.
Look at your Asterisk console (asterisk -rvvv) to see if Microsoft is sending SIP OPTION packages to you. Enable the pjsip logger with pjsip set logger on. The packages look something like this
<--- Received SIP request (527 bytes) from TLS:52.114.75.24:8128 --->
OPTIONS sip:teams-out@my.teams.sbc.hostname:5061;transport=TLS SIP/2.0
FROM: <sip:sip-du-a-eu.pstnhub.microsoft.com:5061>;tag=e58f8c11-1e2e-4f1d-b656-b7a6ac77d090
TO: <sip:teams-out@my.teams.sbc.hostname>
CSEQ: 1 OPTIONS
CALL-ID: c55b1553-c293-4482-b357-74023e1b9061
MAX-FORWARDS: 70
VIA: SIP/2.0/TLS 52.114.75.24:5061;branch=z9hG4bKa5f76fd4
CONTACT: <sip:sip-du-a-eu.pstnhub.microsoft.com:5061>
CONTENT-LENGTH: 0
USER-AGENT: Microsoft.PSTNHub.SIPProxy v.2021.12.1.4 i.EUWE.2
ALLOW: INVITE,ACK,OPTIONS,CANCEL,BYE,NOTIFY


<--- Transmitting SIP response (855 bytes) to TLS:52.114.75.24:8128 --->
SIP/2.0 200 OK
Via: SIP/2.0/TLS 52.114.75.24:5061;rport=8128;received=52.114.75.24;branch=z9hG4bKa5f76fd4
Call-ID: c55b1553-c293-4482-b357-74023e1b9061
From: <sip:sip-du-a-eu.pstnhub.microsoft.com>;tag=e58f8c11-1e2e-4f1d-b656-b7a6ac77d090
To: <sip:teams-out@my.teams.sbc.hostname>;tag=z9hG4bKa5f76fd4
CSeq: 1 OPTIONS
Accept: application/xpidf+xml, application/cpim-pidf+xml, application/dialog-info+xml, application/simple-message-summary, application/pidf+xml, application/pidf+xml, application/dialog-info+xml, application/simple-message-summary, application/sdp, message/sipfrag;version=2.0
Allow: OPTIONS, REGISTER, SUBSCRIBE, NOTIFY, PUBLISH, INVITE, ACK, BYE, CANCEL, UPDATE, PRACK, MESSAGE, REFER
Supported: 100rel, timer, replaces, norefersub
Accept-Encoding: identity
Accept-Language: en
Server: Asterisk
Content-Length:  0
If all is well, you will see ‘TLS connectivity state’ and ‘SIP Options state’ as ‘Active’ in the Teams Admin Center. If you do, you can now proceed to the rest of setup in the Teams Admin Center to setup PSTN calling.
Add a PSTN usage record with the ‘Manage PSTN usage records’ link in the top right of the ‘Direct Routing’ page. Give it a name and save. Then go to the ‘Voice Routes’ tab, add a new Voice Route with your own name and \d+ in the ‘Dialed number pattern’ field. Also add your SBC and PSTN usage record to the Voice Route and Save.
Now go to ‘Voice routing policies’ and edit the Global policy. Add your PSTN usage record there. You may also create a new policy. If you do that, you also need to assign that policy to a user.
We’re almost there, I promise. For the next step, we’re going to need a Windows machine (sorry).
Run the following commands
# Install the Teams module for PowersHell
Set-ExecutionPolicy unrestricted
Install-Module MicrosoftTeams

# Load the module into your environment
Import-Module -Name MicrosoftTeams

# Connect to Teams
Connect-MicrosoftTeams
After the last command you will get a popup, login as admin. If you get a tenant id back, you can proceed.
# Give your user a phone number
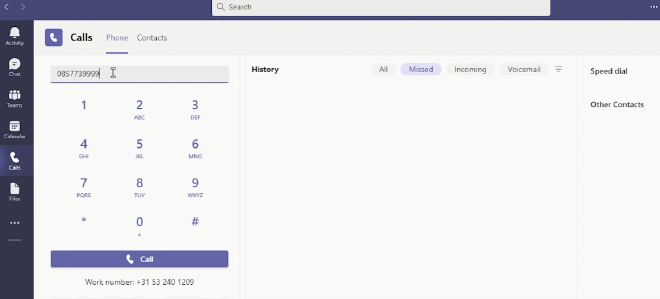
Set-CsUser -ID user@domain.com -OnPremLineURI tel:+<phonenumber> -EnterpriseVoiceEnabled $true -HostedVoiceMail $true
That’s it! Your user will now have a dialpad. Log in to Teams and try to place a call. If something doesn’t work, check the Asterisk console.
Good luck! If you get stuck, please leave a comment on the YouTube video and I, or someone else, may be able to help you out.
If you need a professional solution and live in the Netherlands, check out Speakup Direct Routing which uses certified SBCs. Asterisk is far from certified :).